
Final film:
Research and analysis
I learnt a lot about the skills of researching during this process. Research gives you the building blocks for your project, it’s where you get both your practical knowledge and inspiration, so it’s the most vital part of the creative process and it’s important to be thorough with its. In my project proposal I stated two subjects that I wanted to focus on and develop my skills for in this project, which were using cinematography for visual impact and my knowledge of the film equipment. A logical first step would have been to start finding relevant clips and websites to help me research these points, however my proposed research sent me off on an immediate tangent without me realising. Below is a screenshot taken directly from my project proposal.
I knew I wanted my video to be about nature, but by immediately focusing my research on National Geographic and Planet Earth I was severely limiting myself, as there are thousands of films out there that would be more suited to studying cinematography and shot composition. The only reason I chose them was because they were related to the natural world, and even though they have some excellent shots, there isn’t much in them that I can explore in-depth. I spent about a week trying to write about them but failing, because there wasn’t much to write about. I’ve learned from this stumble that you don’t have to worry about your research being directly linked to your theme, inspiration can come from anywhere and it’s important to explore different possibilities. All films have a theme – mine being nature – and these themes are not there to dictate the style of film you should study. For example, if i had stuck to my original idea of only looking at videos that relate to nature, I would never have discovered that steadycam shots are most impactful when filming humans rather than a nature. I compared the human shots from the film “Tree of Life” with non-human shots, and found that when the steadycam tracked the movement of the humans in the shot it could create lots of emotion.
I think I did plenty of research in terms of using videos and films. I learnt the benefits and downsides of using steadycams and jibs by taking YouTube and Vimeo videos and studying the quality of shots captured by both. This influenced the outcome of my final film because following my research, I decided to not use a steadycam and to use less jib shots than originally intended. I also discovered from video research how to show contrast visually, in a way that you can see the contrast but the shots still flow together to make one film.


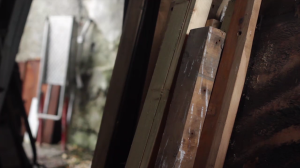
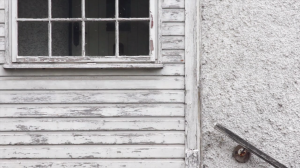
For example Sober taught me that you can have shot sequences like the two above, where shot composition and lighting are completely different, and make one film out of them by slowly mixing them together, and you can see this is evident in my final film where I introduce the man-made shots into the nature ones.
If I was to do this again, the one thing I would change about my research path would be the type of research I did. I didn’t spend as much time as I should have reading books or newspapers, going on websites or blogs, and I think it would have helped to develop my research even further. I did a lot of my own analysis on films, watching them and writing my thoughts, but it’s always good to get knowledge from other places like websites because it’s places like those where you can read about other peoples’ discoveries and opinions. Differing points of view can feed your creativity, they can help you decide what you like and what you don’t. I used someone’s blog that I found to help me learn how to put together good sequences, and I can see their influence in my final film. Their five shot rule meant I ended up getting a wide variety of shots, and having lots of shots in my film that were very different in look made it more interesting to watch. If one blog post helped me so much, imagine how much four or five would have.
Planning and preproduction
My research was a very organic process, and all the parts of it naturally linked together to form different ideas that led me into my finished film. My planning was constant and always evolving the more research I did, there was no definitive line between the two. Every so often I would be inspired and get a new idea for my film, whether it was a specific shot or an editing technique or just a general emotion I wanted to convey and I would note them down as I went along. For example, in this research post you can see me at the end, after analysing the short film, deciding to mix nature and human shots together .
It was only at the end of this, when I collated all these separate little ideas into one blog post, that I could actually get an idea of what my film would look like visually. This was a slightly challenging way to work, because it’s difficult to keep yourself dedicated to a film when you can’t completely picture it in your head. I had anticipated this happening, I knew that working with natural landscapes meant I wasn’t going to be able to do as much planning as i normally liked. I’m a fan of creating multiple shot lists and storyboards until I have a clear path to follow, but with the kind of shots I wanted to get, this style didn’t seem to fit. The places I’d chosen to film – the beach, the fells, the forest – were all such wide open spaces with endless choices of shots and I didn’t want to create a set plan, because it made me feel like a horse with blinders on. I think this awareness of the landscapes I was filming and the worry I had at being constrained by too much planning really helped develop my film, because it left me completely free to experiment with shots. I felt able to spontaneously take out the camera and tripod and film whatever felt right in the moment. Some of the best shots I got were ones that hadn’t been planned in my head.
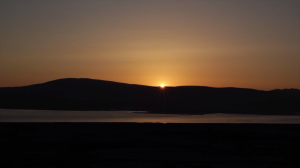
 I got this shot on the same day as the sunset shot that I used at the end of my film, and originally filmed it merely as an afterthought because I liked the way the setting sun outlined the mountains, making them look two-dimensional like a painting. It ended up being one of my favourite shots, and I think gives my film a really strong start.
The most valuable part of the planning for me was my location scouting. I knew as soon as I started this film that this would be a very important part, so I made sure to dedicate a lot of time to it. Going to all these different places meant that by the end of it I got a really clear idea of the type of place I needed: local, near a road for ease of access, good for both wide and close shots. Also, taking a camera with me was extremely helpful because it meant I could take pictures of potential shots and essentially create a “storyboard” folder.

The left image is a picture I took on one of my location scouts, it was inspired by a shot I saw in Edgeland (pictured in the middle). I was really taken by using a shallow depth of field to focus all the audience’s attention on a small part of nature, so I took the picture as a potential shot. As you can see from the image on the right, which is a screenshot from my finished film, I did actually end up doing this shot. I think it worked really well, and I especially like the effect using the jib had on it, it makes this small rock look more like a mountain. If it wasn’t for my location scouting, I may never have discovered this shot.
The other part of my planning to focus on is my monologue. The development of my monologue was very separate to the development of my film. I made two drafts of my monologue, one before and one after I’d had it peer assessed. For the first draft I did, I did not think about how it would fit into my film the entire time I was writing it. I was solely interested in getting all my thoughts and feelings down in writing. The result of this was a piece of written work that was far more complicated and wordy than it needed to be. The thing you need to remember when writing a piece that’s going to be used in a film, is that the shots will do half the work for you. Unlike a story, you don’t have to get all your message into the words, because the visuals can tell the story as well. This is a piece of advice that was given to me by my tutor when he read it through, and it’s a something which I think will be very valuable to remember in the future. There’s more than one way to tell a story in film.
Peer assessment was incredibly useful for me. Constructive criticism is the best way to tailor your work to make it better, because you are getting an outside opinion from someone who’s never seen it before. They don’t know the planning or research that’s gone on behind it, meaning they can give you honest feedback on what they thought worked and didn’t work. I took advantage of this, getting three people to read through my first draft and give me constructive feedback. All agreed that I needed to cut it down, and make a couple of sentences more obvious in what I was trying to say and I took all their ideas on board and rewrote it. The final draft is much better. I made it more suited to being the voiceover for a film by making a lot of the lines shorter and more concise, and shortening the lines meant it read more like a poem, which worked well because my film was edited to music so had a very fixed tempo, much like a poem.
The good thing about getting criticism is you have the ability to ignore it if you don’t think it’s right, provided you give a good enough reason why you’re choosing to ignore it. Knowing what’s best for your film shows that you’ve planned it all out and know your end goal, rather than just making it up as you go. In the past, I’ve always shied away from showing my work to people because I’m embarrassed, but what this project has taught me is that getting other people’s opinions is the fastest way to improve your filmmaking abilities because it encourages you to change.
Testing and development
Test shoots are used to try out any shots you are unsure of and get any major issues out of the way. As I was having a difficult time picturing my film in my head, it was important for me to choose test shoots that would make my planning more grounded. I did three test shoots, each of which covered a different area of my film. My first test shoot was the most successful and had the biggest influence on my final film. For this test shoot, I decided to try to mimic the style of Edgeland as that film was a big part of my research. I needed a specific look for my film, a defined way that my shots would flow and fit together, and Edgeland’s style was appealing to me. It was from this test shoot that I finally knew what the pace of my film was going to be, as well as what my shots would generally look like. Up until this point, I hadn’t been sure whether my idea of having separate shots with no narrative would work or whether it would look boring, but this test shoot assured me that it would be okay, because even with no monologue it’s still interesting to watch. You can see how some of these test shoot shots influenced my final film.(left is test shoot, right is final film)


My other two test shoots were less successful, but equally helpful. Sometimes test shoots are good for showing you what not to do, and that’s what these were. One was testing out my idea of showing a time-lapse of someone drawing industrial landscapes over natural ones. The other was me testing out the jib. For the drawing one, my test shoot showed me that doing a drawing wouldn’t be clear enough, and in order to make it look at least slightly good I would have to scale it up massively and find someone who was very good at freehand drawing, neither of which I had the time to do. Thanks to this test shoot, I didn’t waste any time going into too much detail with researching and planning this idea, I could simply label it a fail and move on.
My jib test shoot caused me to lose a lot of confidence with using the jib, because the shots came out very poorly. However, I don’t think I should have been disheartened so quickly. Using a jib well requires practice, and this is something I didn’t have a lot of. Had I had more time, I would have gone out and done a few more test shoots using it, to really get to grips with it and to experiment with the different types of shot you can get. This test shoot that I did was very rushed and not very planned, so it wasn’t a good introduction to the jib. I would have liked to have added a couple more jib shots into my film, just to make it all a little less static.
Production and Shoot
I was quite limited for time for my shooting, because I have college and work for all days except one. However, I didn’t see this as much of a problem because in my opinion, the ideal time to film is between 7 o’clock and 9 o’clock (sunset), which was the time that I had free to film. It’s between this time that the sun sets and that’s when you get the best lighting. In photography, it’s known as the golden hour, which is the first hour after sunrise and the last hour before sunset and it’s something that I first read about in the book, ‘The Complete Digital Photo Manual’ by . I hadn’t really thought much about it until I did my jib test shot. When I was re-watching the footage, I noticed that even though the camerawork was poor, the shots still looked okay because of the lighting.


The shadows are more prominent, but the light is also more diffused, and the overall effect is a softly lit picture with a warm glow and more dimension than the lighting you get at midday, which makes everything quite flat and dull. I knew after seeing my test shoot that this is what I wanted my actual shots to look like, so I spent a couple of weeks getting up early and staying out late filming my shots, and I think it really pays off. It’s important to think about this when you’re filming outside, because it’s incredibly difficult to use artificial lights outside so you have to rely on the natural lighting.
An unplanned problem I had, was not collecting enough shots to fill the length of the monologue, which I talk about in this blog post. To counter this problem, I had to develop my idea a bit further to fill it out and decided to collect some shots of man-made structures that provided a bigger contrast to my nature shots than what I’d originally planned. In order to make the contrast more apparent, I filmed these extra shots during the middle of the day, and planned my shoots for days when I knew it was going to be grey and cloudy.


On the left are the man-made shots and on the right is natural. I like the fact that the ones on the left have much less colour, because it highlights the vibrancy of colour in the ones on the right and symbolises the way humans are dulling down this world and are a burden on the Earth.
Something that didn’t work well was the jib. I only had it for a couple of days, so I was very rushed using it and it meant that I didn’t use it to its full potential. As you can see when you can see when you watch the film, there’s actually only two shots where it’s apparent that I’ve used it, as none of the other shots worked and I couldn’t use them. The main reason why it didn’t work was because I tried to use it on my own in the middle of a forest. I had no one to help me hold things, and trying to screw it onto the tripod and operate it on my own was very tricky. For one, I couldn’t screw it on tight enough, and because it was loose it wobbled, leading to jerky shots. Also, I couldn’t operate the jib and properly and see what I was filming at the same time, it would’ve been better to have had someone there that I could have directed, so they would’ve moved the jib and I would’ve watched the camera. I learned from my mistake, and on all subsequent shoots I did for this film I took someone with me, however by this time I’d already had to give the jib back. Having someone else there was very valuable, not only because they could help me carry equipment, but also because I could ask for their opinions on shots I got. It didn’t matter if they didn’t know anything about film, because if a shot is good, anybody will be able to tell.
Post-production and edit
I felt that the best way to approach my edit was to start with the music. I’ve stated many times throughout this project that I wanted to try to edit my shots in time to the music like they did in Edgeland, and I’d already experimented with this in my forest test shoot. My music was the framework of my film that dictated the pace so it needed to be done first. I laid my music out, and in order to help myself with the edit I immediately went through it and added tabs/marks to every single peak in the music.

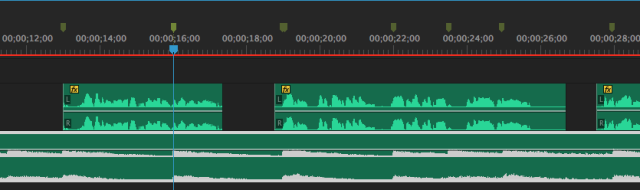
These were all the potential points that I’d cut my footage at, so by marking them like this it made editing so much faster. I could easily pick the shot I wanted next and all I had to do to cut it to size was look at the markers. Even though I didn’t use all of the markers in the end, it was very helpful to have them all there as when I began my edit I hadn’t quite decided exactly how I wanted my shots to go together.
Another thing that made editing more efficient was logging my rushes, especially my audio ones. I’d tested out multiple voices for my monologue and each person had at least five takes, which added up to a lot of audio files. Going through them, labelling the ones that were good, ones that didn’t work and who’s speaking in each meant that I could easily pick the one I wanted to use in my film. Also, if ever I decided that I didn’t like the way a certain line of the monologue was spoken, it meant I could go back to my audio clips, find the ones that worked and take the line from one of those instead. Every time I make a film, I see logging rushes as a chore and never enjoy doing it, but as soon as I get to editing I’m always grateful of it. It’s a small step that can’t be missed.
One thing I realised during editing is that there were a lot of shots that I hadn’t held for long enough. For every shot I did, there are moments either side of the actual shot where I’m moving the camera or messing with the settings. Sometimes the actual shot but wasn’t long enough to fill the gap I needed and you can see the camera move. For example, at the end of the dune shot you can see the camera moves up slightly, and because the shot was so still you can clearly see it. Unfortunately there was no other part of the shot I could use and no better ones to take its place so I was forced to use it.

A way I could have avoided it would have been to pick the music before I got the shots instead of after, because then I could have known the tempo of it and the speed that I would be editing at, meaning I’d know how long to hold the shot for. For future edits, I now know to hold shots for longer than I think’s necessary, because you’re never sure what’s going to happen during an edit and it’s better to have too much footage than too little.
In general I’d say editing went fairly smoothly, even though at first I didn’t have enough shots and had to go out and film more. The reason this didn’t affect me was because I’d anticipated that they’re may be problems and so had ensured that I didn’t start editing too late and left enough time to fix any that may arise. It’s always important to allow time for error in film, because it’s such a reliant media. You’re reliant on so much, whether it’s actors, weather, equipment being free or editing software and you can’t just assume that all these are going to be ready and working for you when you need them.
Evaluating and monitoring
I recorded my entire work flow via my blog, writing down every part of it and splitting it up into relevant sections. It’s always the best way to do this to keep your head clear, because a lot of the creative process involves spontaneous ideas and if you keep them in your head for too long you’re likely to forget them. Adding in pictures and screen grabs is a great way to aid this process, because a picture speaks a thousand words and sometimes a visual is what you need to clarify a point you’re trying to make. If you’re analysing a certain shot, it’s easier to add a still from that shot into your work rather than trying to explain it.
The benefit of writing all your work down is the ability to read back and reflect on it. As your project changes and develops, it’s good to be able to look at where you’ve come from and see why you made changes to it, what parts did work and what didn’t. This happens mostly once you’ve completed your test shoots, because if a test shoot didn’t work, you can look back at all your previous notes and link the planning to it, meaning you can then explain where you went wrong and how you’re going to alter it to make it better. By writing about everything you do you are making yourself question all of the decisions you make, thus proving to yourself that what I you’re doing is relevant to the project, and showing your workflow will mean you can explain where you got the information from to make your final film.
For my project specifically, my reflection developed my project a lot, and saved me from making some big mistakes. For example, if I hadn’t looked back at my speed drawing test shoot, I might have carried on with this idea and tried to include it in my final film. It’s better to discover something doesn’t work early on so you can fix it then, rather than discover it when it’s too late to do anything.
Conclusion
This finished film is the first film I’ve made that I am proud of showing to people. The reason for this is because I put a lot more effort into everything I did. I took the time on each shot I did to make sure I was happy with the composition and the lighting before I pressed record, and the improvement is amazing. Also, as I knew how important the music would be to this, I spent longer trying to fin a track that worked and ended up layering up two tracks just so it would work better with my monologue.
I feel like it was during this film that I became more confident in the practical side of film. Up until this point, my films have always been fairly weak compared with my planning because I was unsure of how to get the most out of the equipment I was using, but this project has allowed me to really get to know all the different settings on the camera. I now know to not go above 400 with the ISO because the higher you go the grainier it gets, and I know to keep the shutter speed at 1/50th because that is how the human eye sees. It’s little details like this that increased the quality of my film to a standard I was happy with. In my film I do actually experiment with this new understanding of my camera, I did one shot in very low light and increased the ISO to see how it affected it and the result is below. As you can see, the shot is a lot grainier than all my other shots, something which I wouldn’t have been aware of or thought about checking before this project.
This film has also been great for developing my confidence about creating an individual film. I have never been the most decisive person, but working on this film forced me to be, because I had to plan out my weeks to ensure I didn’t run out of time. I had to check weather forecasts and use them to plan out when I was going to film, I had to keep all my rushes organised to make sure I didn’t lose any of my footage, I had to confidently tell my mum where I wanted to go to film because she was driving instead of letting someone else pick like I normally would have. This kind of attitude is something that will benefit me not only in the film industry but also in everyday life, it’s the attitude you need to get jobs done and keep your life on track, and it’s the kind of attitude that gets you noticed by future employers.
Something that I identified that I can work on in my next films is working with a group, especially working with a group when I’m the one directing them. When I started out on this film, I tried to do it all on my own with no outside help, but by the end of it I started to see the benefit of teamwork. I discovered quickly that going to all of these filming locations with all this equipment was far easier when I took a couple of people with me. Even if their only purpose was to hold the equipment for me when I wasn’t using it, or to change batteries and SD cards for me when I was too busy, it all helped me because it gave me one less thing to think about, meaning that I could focus more on scouting for potential shots. Another part of teamwork was peer feedback. I took all the peer reviews I got of my monologue and of my shots into account, and used them to develop my film even further. At first I was too shy to ask for feedback, but once I started it immediately saw the benefits. I was having a hard time writing my monologue, but as soon as I read it through with a couple of other people it was clear to me that bits of it I needed to change to make it better.
Working on this film has only acted to increase and solidify my love for cinematography. Now that I have the practical skills as well as the creative will of wanting to make shots look nice, I feel more able to venture out into this field of film and experiment more. For this film, I focused solely on cinematography and shot composition, but for future films I think I’d like to try my hand at creating well-shot films that include a narrative as well, with a storyboard and script. It adds another layer to it and makes it more interesting, because not only do you have to think about how to set up each shot individually, but you also have to consider how they link together, and also how it links to the story-line. This feels like a natural next step for me, and I look forward to trying it in the future.

This grade has been reviewed and confirmed by the external moderator from the exam board, but will not be official until you receive a letter from UAL:
This has been a challenging project for you, Kitty, as you balanced the FMP with the demands of World Skills and your A-level Maths revision. This has undoubtedly impacted on the quantity of work you have produced compared to your previous projects. In recent weeks, you have turned this around by producing several extremely high-quality posts tackling the spectrum of research, analysis, story development, production, editing and evaluation. Everything you’ve done has been delivered at a Distinction level, even though there hasn’t as much of it as in previous pieces. Consistency of your output is part of how we settle on your grades, and we need a quantity of work to do this. In this particular instance, I think you land on the right side of the quantity needed in this project, particularly regarding the broader scheduling and organisation required in managing your entire study program (i.e. Maths and World Skills as well). Well done. Distinction.
LikeLike